Thanks for stopping by! We're two cousins who love to craft on the cheap and share our ideas. We'd love for you to stay awhile, pull up your Pin it! button, sewing machine, and let us know what you think!

Saturday, August 25, 2012

What I Wore Sunday: Week 30

frame to match teal and white

…52 weeks of shaking up the wardrobe…

The Rules:

  1. Wear a different outfit every Sunday.

  2. Incorporate at least one article of clothing or accessory that was either refashioned, sewn myself, or handmade.

  3. Outfits can be worn more than once; just not the same way.

Here’s what I wore:

week 30

This is a terrible, awful picture.  Firecracker took it, and he’s five.  Sorry.  I chopped off my head because I was sneezing in the picture.  It wasn’t pretty!  ;)

Anyway, this is the lace shirt I made with a blue under shirt (that I made) and a black skirt (that I made).  This skirt was made from the same pattern I used for my Easter skirt in 2011.

signature nat

Pin It!

Friday, August 24, 2012

Fab Friday

I’m scrambling around right now to get everything ready for a weekend trip up to Idaho. Mainly I’m trying to have enough crap to occupy 2 kids on a 3+ hour drive, both ways. Uphill. In the snow. I hit up the library and Target’s dollar spot, so hopefully (knock on wood) things will go well. Right this minute, I’m making one of these for my oldest.

She’s got really straightforward instructions, and I’m almost done! Over at Super Jenn. Mine are free because I have more fabric than any one person should really have.

Next, I’m hoping to make some of these for the car drive.

I’m hoping the novelty of cool crayons will make coloring cooler. Plus, they won’t roll and get lost like regular crayons. I hope. Over at Suenos encantados.

Okay, so other great stuff I saw this week….It’s mostly food. Sorry. That’s what’s on my brain right now, I guess.

I have an absolutely favorite blondie recipe over at Smitten Kitchen, but I may have to give this one a try from Our Best Bites. Pretty soon, I think.

Pretty sure I need this book. So, anyone who wants to get me an early Christmas present, here’s what I want!! Over at Amazon.

I am ree-di-cool-ous-ly excited for Halloween. Always am. I love it. I already feel behind because I haven’t figured out what our family will be this year. But, these pumpkins over at Be Different Act Normal make me so happy. Yeah! I figure I can start easing out Halloween décor the beginning of September, right? Smile

Anyway, I’ve gotta hustle and finish getting my crap together. Wish me luck on the driving!!

Pin It!

Thursday, August 23, 2012

Button Front Skirt

…from a button front shirt!
Shirt to skirt refashion from the Crafty Cousins (20)
These cute little skirts are perfect for Summer play!  They’re also a great way to thin out your wardrobe and give you an excuse to go shopping!
I have this awesome friend who cuts my hair for sewing projects.  She’s my personal hair dresser, and I’m her personal seamstress.  It works for us!
Anyway, she wanted some skirts for her little gal, and I had these shirts that I’d had in my closet FOREVER. 
Shirt to skirt refashion from the Crafty Cousins (1)
I loved the fabric, but hated the shirts.  You know what we do when we have that situation!  Refashion!  :)
Start by cutting the tops of the shirts off.  You need to add an extra two inches for the waistband casing.
Shirt to skirt refashion from the Crafty Cousins (2)
Serge or zig zag across the tops of the shirts.
Shirt to skirt refashion from the Crafty Cousins (3)
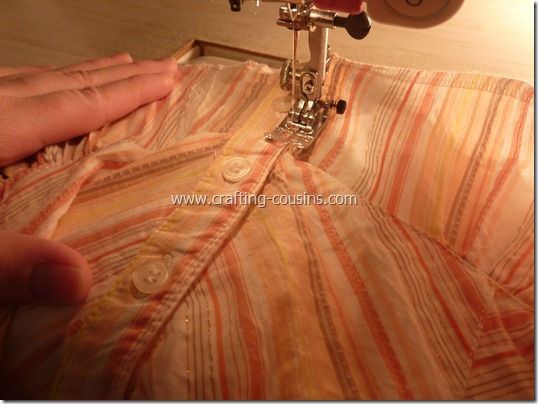
Stitch the button closures closed.  Shirt to skirt refashion from the Crafty Cousins (4)
Also, if the shirts don’t have a straight hem--meaning that the shirts are longer in the front and back than they are on the sides--be sure to even up that hem.  Unless you want a skirt that is longer in front and back than on the sides.
Turn the skirt inside out and measure two inches for the casing.  Pin it into place. Sew around the bottom of the casing and leave a small opening for your elastic. 
Shirt to skirt refashion from the Crafty Cousins (5)
Measure your victim’s waist and cut the elastic about an inch smaller than the waist measurement.  Using a safety pin in one end of the elastic, thread it through the opening in the casing.
Shirt to skirt refashion from the Crafty Cousins (7)
Once the elastic is threaded through the casing, sew it together and sew the casing shut.
Shirt to skirt refashion from the Crafty Cousins (15)
When you’ve done that, evenly distribute the fabric over the elastic.  You can stop here, or you can secure the elastic to the skirt by sew.  I do this just to be sure that the elastic doesn’t roll later.
Shirt to skirt refashion from the Crafty Cousins (17)
Just sew a short, straight seam at the front, back and sides of the skirt.
Trim your threads, and you’re done!
Button front shirt to skirt refashion from the Crafty Cousins
Your little lady will look adorable and be comfortable in these cute, breezy Summer skirts!
signature nat
Pin It!

Wednesday, August 22, 2012

Bold Stripe Shirt Refashion

I’ve been going through all of my clothes and if I haven’t worn them recently, and it’s in season, it went into a box to either DI or refashion. Here are 2 shirts I decided to refashion.Do your shirts tend to shrink up? Get shorter or something? These did.
Black and White Stripe (12)
Now, if you want to try something like this, it’s important they’re either the same brand/size shirt, or match in size/width so you don’t get weird bunching and such. Does anyone remember my Britta shirt I refashioned here? I did the same idea, but more bold, and I did horizontal stripes instead of the diagonals.
Black and White Stripe (5)
First, I chopped off the bottom of the shirt that I wanted to be the mail body. I left about 1” at the V so I’d have room for the seam allowance, and it didn’t look weird. Make sure your line is straight! Next, I started chopping up the stripes. I just went with the width of my ruler (5”) because I’m lazy cool like that.
Black and White Stripe (4)
Once I had my stripes, I laid out my shirt to see if I liked the overall look. (make sure you know which side is front and which is back. The seams are usually a little different!)
Black and White Stripe (6)
Then, I matched up seams and middles and pinned the stripes together.
Black and White Stripe (9)
The double pins are to keep my seams going the right direction. Then, you sew. Be careful while you’re sewing so you don’t stretch it out and make wonky seams. (true word, for real) Press the seams open on the inside
Black and White Stripe (10)
And then topstitch on the outside with a double needle and the colors of thread (or just sew twice if you don’t have a double needle)
Black and White Stripe (11)
I like to wash it to make sure all the threads and what not are off. So here it is with my newest pair of cut-off shorts (I was so sad to see those pants go *sniff*)
Black and White Stripe (1)
And from the side:
Black and White Stripe (2)
And with some of my favorite new pants:
Black and White Stripe (3) copy
So what clothes need a facelift? This could make a cute skirt too!
Pin It!
Related Posts Plugin for WordPress, Blogger...